Showing posts with label crafts. Show all posts

Monday, May 22, 2017

High School Graduate DIY Survival Kit {diy, craft, gift}

HIgh School Graduate DIY Survival Kit full of Life Lessons ever kid (going to college or not) needs to know. Craft. Inexpensive gift. Lesson. Church. Teacher. Alohamora Open a Book www.alohamoraopenabook.blogspot.com

In college I learned I could get by on $30 a month for groceries.  In college I learned I could work more, study more, and have more fun with friends than I thought possible.  In college I learned that I should think before acting b/c the consequences can be painful and long lasting.  In college I learned that even the hardest classes still only last 4 months and you just have to hang on.  

College, and those early working years as an elementary school teacher, provided a lot of lessons learned.  I loved those years of learning more about myself and what I was capable of.  I truly hope the high school kids I interact with at school or at church can make fewer mistakes than I did and learn who they are and what they are capable of. 


HIgh School Graduate DIY Survival Kit full of Life Lessons ever kid (going to college or not) needs to know. Craft. Inexpensive gift. Lesson. Church. Teacher. Alohamora Open a Book www.alohamoraopenabook.blogspot.com

When I was 17 I had a teacher at church that gave me this small Survival Kit.  It was similar to the kit shown above.  I don't remember all the items and lessons those items taught, but I remember looking back at the survival kit for many years after I received it.  

I teach junior and seniors in high school at church.  Many of the kids are graduating this week, and moving onto bigger and better things.  I gave them my version of a High School Graduate Survival Kit.  I also gave a little info or story to go with why that lesson is important to surviving the storms of life.  


HIgh School Graduate DIY Survival Kit full of Life Lessons ever kid (going to college or not) needs to know. Craft. Inexpensive gift. Lesson. Church. Teacher. Alohamora Open a Book www.alohamoraopenabook.blogspot.com

When I scoured Pinterest I found some okay ideas for Survival Kits, but nothing I felt was really good to go like I was hoping.  Therefore, I made what I consider to be the best survival kit for high school graduates moving onto the next phase.  This kit has some candy and all of the items are easy to find and not expensive.  This kit has some fun reminders as well as deep and meaningful lessons.  I'm telling you, this kit has it all and it is good to go.    

You can print off the bag label/descriptions here; it is a document you can edit if there is something you want to remove, add, or edit.  

In regards to the Survival Kit, I placed all of the items in a sandwich bag, and handed a bag to each of the kids as we had a great lesson.

May this Survival Kit be helpful, and may it make your life a little easier b/c it is already done.  

Happy Do It Yourself Survival Kit Making and Teenage Influencing!


Thursday, November 5, 2015

Christmas with Kids gets 3 Stars Christmas

Christmas with Kids: Recipes, Activities, and Crafts for Amazing Family Memories is a non-fiction e-book/kindle full of fun.  It is a collaborative bloggers project, and it earned 3 out of 5 stars in my book review.  Alohamora Open a Book http://alohamoraopenabook.blogspot.com/ activities, fun with kids, crafts
A bunch of bloggers, not me b/c I'm not cool like that, got together made this cool book (which I totally think the cover of the book is gorgeous) full of activities, recipes, and traditions you can do with your family to make the holiday season less stressful, more meaningful, and all around more fun for everyone.  

I was lucky enough to read this book before it's release date, Wednesday November 10th.  You can purchase Christmas with Kids: Recipes, Activities, and Crafts for Amazing Family Memories from the editor of the e-book's website, A Whimsical Life and get bonus content of three videos to go along with the book, or you can purchase the Amazon Kindle edition now. 

I give Christmas with Kids 3 out of 5 Stars; however, I will state that I am brutal reviewer.  I notice things most people don't even think to notice or fret about.  However, when you are a librarian and review books ALL the time it is part of the territory. 

Frist off, I will again say the cover is gorgeous.  Second, I will also say that there were some fun activities, recipes, and crafts that I'm planning on trying.  I LOVED the Christmas Light Scavenger Hunt idea: I definitely think it'd make a fun couple's date.  Now if only my husband and I could find some friends ;).  I also think the extra touches in the Cookie Exchange Party was super cute and made it unique.  The blackberry bread pudding recipe sounds delicious and the recipe appears sound.  All in all, it is a fun book (that is totally inexpensive) and would make a great addition to a family's holiday traditions.  

Now, I did say I'm a brutal book reviewer, and I wanted to stay true to who I am, so I have to give you the parts of the book that lost points for me.  I realize the book is full of different bloggers with different writing styles, different photography skills, and detailed instructions, but I would hope in a book the writing and layout would feel more cohesive.  I would hope the pictures, and depth of instructions be similar with mention of age activity or craft best for.  I would hope the explanation of the text would be similar in style, and the look of the book be similar to really tie the book together.  

Overall, the writing seemed unpolished, but I may be the only person to think of that.  In regards to layout, I would've liked to have the book more organized and labeled as the crafts section, recipes section, and activities section.  I would've liked to have seen the table of contents more clearly define the different sections of the book, and an index would be awesome.  One aspect of the book that bothered me, but maybe it is just my computer, is the hyperlinks did not consistently work the way they intended.  I was sent to all different sites, and some didn't work.  I feel the links to supplemental materials would've been best to have all in the same area. 

Some of the crafts, activities, and recipes I was super excited about, and others I could care less about; though I'm not super crafty..  However, I will say I wish the last activity/tradition was awesome and unique (like the Christmas Light Scavenger Hunt) rather than something almost everyone does already (Christmas Eve pjs.).  

To be honest, Christmas with Kids is an affordable book with some really great ideas to make Christmas that much more fun with your family.  

If you're looking for some Kid crafts or activities to do then this book is a good find.  Go check it out. 


What are some of your favorite things to do with your family during the Holiday Season?  


Tuesday, December 23, 2014

Cinnamon Ornaments- a Diet Friendly Neighbor Gift

Easy to make Cinnamon Ornaments. This makes a perfect Neighbor Gift.  An especially perfect gift when you don't want to give treats, goodies, or food of anykind.  This ornament can last for years, smells amazing, and an original gift.  Alohamora Open a Book http://alohamoraopenabook.blogspot.com/

I love getting Christmas cards from friends and family.  I also love giving little gifts to neighbors and loved ones that are near by. It's a fun, but oh so busy, time of year.  

I have a friend that specifically requested they don't receive treats this year b/c they are trying to be healthier as a family.  I fully support this.  I love baking and sharing the plethora of treats I make, but I am a big fan of being healthy.  

There are also way too many allergies out there from nuts to eggs to gluten.  With all of the limitations I figured a universal non-edible neighbor gift, but still something I can make, would be perfect.

I'm not the most crafty of individuals, but I do love to bake.  Therefore, Cinnamon Ornaments is a baking "craft" that's perfect for me, and people like me.  It also fits that "universal non-edible gift."  

With only 4 ingredients, and a little time, you can also make this meaningful gift.

You can use whatever cookie cutter you want for the shape.  However, I thought it would be fun to make them in the shape of the state in which we currently live.  We may not always live in Arizona, and same for those that we give this present to, but this ornament will be a way to remember some of the fun we had while here.  

Cinnamon Ornaments
Recipe: Alohamora
Active Time: 45 minutes
Inactive Time: 1 day or more until dry completely
Servings: 15-20 3 inch ornaments. 

Ingredients: 
2 c. ground cinnamon
1 Tbsp all-spice
2 c. applesauce
1/4 c. flour, or until reach desired consistency
cookie cutters

Directions: 

  1. Preheat oven to 200 degrees.
  2. Line two cookie sheets with parchment paper or silicone baking mats.  You want to make sure you do this step to avoid ornaments sticking to the pan. 
  3. In a large bowl or stand mixer combine the cinnamon, all-spice, and applesauce together. 
  4. Add the flour a tablespoon at a time until you reach your desired consistency.  You don't want the mixture sticking to your hands, but you don't want it to be too crumbly.  If you mixture is too wet and sticks add a little flour.  If you mixture is crumbly and dry add a bit more applesauce.  
  5. Dust a clean surface with cinnamon, and dust some cinnamon on your rolling pin.  
  6. Place your dough on the cinnamon dusted surface and roll it out to approximately 1/4 inch in thickness. 
  7. Cut out shapes with cookie cutters.  
  8. Using a spatula carefully place the ornament on the prepared pan.  The cookies don't spread in the baking/drying process so you can place them closer together. 
  9. Use a straw to make a hole at the top of the ornament so you will be able to hang it with a ribbon. 
  10. Place your cookie sheets in the preheated 200 degree oven and bake/dry for 2 hours.  
  11. Remove pans from the oven.  Using a spatula remove the ornaments from the pan and place them on an air rack to dry for a day or so.  You don't want to leave them on the pan to dry b/c they will begin to stick. The air rack will also help your ornaments to dry a little quicker and look a little cuter.
  12. When dry place a ribbon through hole, tie it off, and place it on a tree or give it away. 
  13. Enjoy the cinnamon smell in your home and tree!
  14. Store ornaments from year to year in a ziploc bag and keep it away from items that can crush or break it. 

Happy Cinnamon Ornaments gift giving! Enjoy the wonderful cinnamon smell on your tree, and it will last in your oven for the entire Holiday Season.  

Merry Christmas!  Happy Holidays! 


Friday, March 21, 2014

DIY the Perfect Tablecloth

DIY the perfect sized tablecloth with fabric that is cheap/affordable and cute.  Easy sewing project that takes no longer than an hour. Alohamora Open a Book http://alohamoraopenabook.blogspot.com/

I love tablecloths.  They keep the table looking nice, the toddlers can "accidentally" make a mess on them, and I can just toss them in the washer with no harm done.  Green smoothies seem to be the biggest culprit for a tablecloth change in our house.  

I have come to really love the convenience of a tablecloth, but to be honest there was a time where I couldn't find a tablecloth I liked in the size I needed.  It was kind of ridiculous.

I feel there were/are way too many old lady, way too nice lacy/frilly, tablecloths out in the world when really I just wanted something that looked nice, young, fun, fit my table, and did the job.  If I did find an okay tablecloth they were ridiculously expensive and usually not quite the size I needed.  It was kind of frustrating.   

Eventually I came to the conclusion that I was not going to find a tablecloth I liked for a price I liked, so I should just make one.  

I've made several tablecloths since that decision, and I couldn't be happier with them.  They are easy to make and very affordable... aka easy on the wallet so I can buy other fun baking items.  

First step in The Perfect Tablecloth is to buy the fabric.  

You'll have to measure your table and then add the hangover amount you would like.  The ideal hangover amount is anywhere between 8 and 10 inches on each side.  However, you can go longer depending on the look you are going for.  The longer the hangover the more formal a table can look.  With my young kids I didn't want too long of a hangover so I went with 8 inches.  

For the quick math, measure your table length and width.  Add 16 inches (b/c you want 8 on each side) to the length, and then add 2 inches for seam allowance.  That should give you the length/amount of fabric to buy.  Be sure to add a little extra to allow for shrinkage when you wash and dry the fabric.  

Don't worry if you end up with extra fabric.  I'm going to show you some fun things to do with that extra fabric.        

DIY the perfect sized tablecloth with fabric that is cheap/affordable and cute.  Easy sewing project that takes no longer than an hour. Alohamora Open a Book http://alohamoraopenabook.blogspot.com/
Now as far as type of fabric to get, you don't want a flimsy fabric but instead need something with a little weight so it keeps it's place a bit on the table and has a bit of durability to it.  Heavier fabric is pretty expensive at JoAnns even with a coupon, but Ikea actually has the most perfect tablecloth fabric.  Their fabric is super cheap, pretty decent quality, it's the heavier fabric you need/want, and they have some crazy to more toned down fabric prints to satisfy whatever your heart desires.  Seriously, head to Ikea for your fabric and you'll end up getting a tablecloth for about $7 a yard.  That's pretty darn awesome!

Second step is to wash, dry, and iron your fabric.  This is a must for any sewing project.

Third, you will want to square your fabric off.       

If you see in the picture below the fabric is shorter on one side/edge.  When you buy fabric and then wash it it doesn't end up squared and ready to sew.  Therefore you need to cut it so it is all even.   


DIY the perfect sized tablecloth with fabric that is cheap/affordable and cute.  Easy sewing project that takes no longer than an hour. Alohamora Open a Book http://alohamoraopenabook.blogspot.com/

You can do this a couple of ways, but it depends on the fabric pattern you bought.   If you bought a fabric with stripes or dots and there is a set line of sort with that pattern you can lay your fabric out flat and on one end see what line or dot you want to cut up too.  For example, on my polka dot tablecloth I found a the first row of dots that was complete and used the bottom of that dot to cut my fabric aka square my fabric off.  

If your fabric doesn't have a set pattern with distinct rows you can use the string method shown below.  On the shortest part of your fabric begin to gently pull a piece of string.  You will see this string pull across the width of your fabric.  That string will give you a squared or even "line" to cut across.   
DIY the perfect sized tablecloth with fabric that is cheap/affordable and cute.  Easy sewing project that takes no longer than an hour. Alohamora Open a Book http://alohamoraopenabook.blogspot.com/
Fourth, cut the length

I found it easiest to lay my fabric in fourth lengthwise (like a hotdog).  It allows me to work with the fabric a bit better.  Since my fabric is squared on one end I measured down one side the length that I need (94 inches for me) and mark that with a pin.  

Then I would measure down the other side the same amount and mark it with a pin. Finally, I would use my cutting ruler (b/c it is long enough to go from one side to the other) and cut the fabric.  

Now, you should have squared fabric on both ends.  You can do the same process with the width.  I am lucky that on the width I don't even have to cut the Ikea fabric so I just leave the selvage edges.

DIY the perfect sized tablecloth with fabric that is cheap/affordable and cute.  Easy sewing project that takes no longer than an hour. Alohamora Open a Book http://alohamoraopenabook.blogspot.com/
Fifth, iron the seams of the tablecloth. 

Using an iron and a ruler you need to iron and pin your seams.  Earlier I accounted for 2 inch seam allowances on the length.  I like to first press/iron up 3/4 of an inch, then I measure up 1 1/4 inches more and press that.  That fold prevents the fabric from fraying over time.  
DIY the perfect sized tablecloth with fabric that is cheap/affordable and cute.  Easy sewing project that takes no longer than an hour. Alohamora Open a Book http://alohamoraopenabook.blogspot.com/
I press and pin the entire seams.  As I stated earlier I don't have to cut the selvage off of the width of the tablecloth.  Therefore, I fold it up about an inch (depending on the selvage and any Ikea printing) and press the seam there.  The selvage will not fray so you don't have to worry about that edge showing.  

Sixth, pin/miter the corners.

The picture below shows the four steps to miter the corner.  First, fold up the corner about a 1/2 an inch and cut a triangle off of the top so it looks like the top left picture.  Second, fold each side in until they meet in the middle.  It should look like the bottom left picture.  Finally, pin the mitered corner.    
DIY the perfect sized tablecloth with fabric that is cheap/affordable and cute.  Easy sewing project that takes no longer than an hour. Alohamora Open a Book http://alohamoraopenabook.blogspot.com/

Seventh, sew a straight stitch around your entire tablecloth removing pins as you go. 

You do not need a fancy sewing machine or even a fancy stitch for this tablecloth.  All you need to do is sew a simple straight stitch about 1/8- 1/4 inch from the inside folded edge like you see below. 

When you get to the corner you will make a simple triangle to secure your mitered corner down.  In the top left box you will see I continued past the mitered corner line and sewed an extra 5 to 10 stitches onto the other seam.  Place your needle down into the fabric, raise your foot (but your needle is still in the fabric), turn your fabric 45 degrees like you see in top middle box, and then lower your foot.  Next, holding your reverse down sew backwards until you are about 5 or 10 stitches past the mitered line again.  Place your needle down into the fabric again, raise your foot, turn your fabric another 45 degrees (so now your have turned 90 degrees total in the same direction), and lower your foot.  Your fabric and table cloth should look like the top right picture.  Now you will be facing forward on the next side of your fabric and you can proceed to sew a simple straight stitch along the edge of the fabric.  

When complete you will now be able to see a stitch line of a triangle in your mitered corner as shown below.    
DIY the perfect sized tablecloth with fabric that is cheap/affordable and cute.  Easy sewing project that takes no longer than an hour. Alohamora Open a Book http://alohamoraopenabook.blogspot.com/
Finish sewing around your tablecloth created that triangle in each of the four mitered corners. 

Eighth, you can now enjoy your completed tablecloth that was cheap and is the perfect size for your table.  
  
DIY the perfect sized tablecloth with fabric that is cheap/affordable and cute.  Easy sewing project that takes no longer than an hour. Alohamora Open a Book http://alohamoraopenabook.blogspot.com/

To be honest, the cutting and ironing/pressing of the seams takes the longest.  For a beginner sewer like myself this tablecloth takes me no longer than 2 hours from start to finish.

PS, my kiddos love this new tablecloth fabric with all of the butterflies, bees, and ladybugs to find.   

Friday, March 7, 2014

DIY Gallery Wall- A Simplified How To

DIY Gallery Wall, a simplified how to tutorial.  It's a lot easier than you think, and it is affordable.  Alohamora Open a Book. http://alohamoraopenabook.blogspot.com/

We have a large open spot on the wall that after living here for a couple of years I finally decided a gallery wall would look really nice there.  I realize I'm slow, but I am of the personality that I leave it blank until I know exactly what I want to do.    

So, I started to do some research aka I looked around on Pinterest and found a couple of Gallery Walls that peeked my interest.  One of the gallery walls had all black and white canvases.  I thought that looked really cool.  Another gallery wall I liked had all frames that were the same color..  I decided I wanted to do a bit of both.

I soon realized I could not afford to do all or pretty much any canvas pictures.  However, I really liked them.  So, I DIYed some canvas pictures; check it out here for a tutorial. 

Then I couldn't quite find the frames that I was imagining/picturing in my head.  Therefore, I made some and I am much happier with them.  All I had to do was buy some plain frames at JoAnn's being thrifty using my 40% off coupon and painted them myself.  Check out that Striped Picture Frame DIY here.

Now that I have everything ready, let's get down to business with the DIY Gallery Wall Tutorial

Materials you may need: 
  • canvas, frames, and pictures
  • ruler
  • pencil
  • large butcher paper to cover your gallery space on the wall
  • painter's tape aka blue tape
  • level
  • hammer and nails to hang  


First step, buy however many canvases and picture frames in various sizes that you want.  I seriously just went with my gut thoughts as I stood in the canvas aisle at the store.  Canvases and unfinished frames are really cheap with a coupon so if you buy more than you'll end up using I'm sure you'll find some fun project like this fun crayon one I saw on Pinterest that you'll need a canvas for. 

Second, lay out your canvas and frames on the ground.  Explore options and possibilities for your gallery wall layout until you find one you are happy with.  Below are just a few of the options I was brainstorming.
DIY Gallery Wall, a simplified how to tutorial.  It's a lot easier than you think, and it is affordable.  Alohamora Open a Book. http://alohamoraopenabook.blogspot.com/
Third, now that you have the layout down you need to pick which pictures will go on which frames.  We had just had family pictures done and picked from those.    

I do think it would look cool if you took great pictures yourself or had several family picture sessions throughout the years to pick from.  You could have a mixture/gallery of pictures from several points in time. 

I'll have to work on that for down the road and switch out canvases and pics as I see fit.  Personally, our only other family pictures were taken when I was 9 months prego.  That was ridiculous and no women should ever do that; those pictures are no bueno and are definitely not going up on a gallery wall.  

Fourth, order your pics and make your canvas pics and frames using the tutorials linked here.  

Fifth, get some large paper/butcher paper and lay it out on the ground as seen below.  You'll need the paper to be at least as big as your gallery wall.

We used engineer plans for our paper and taped it together. As far as where to lay it out, I would suggest laying your paper out on hard flooring like tile or wood to help with your leveling process down the road.      
DIY Gallery Wall, a simplified how to tutorial.  It's a lot easier than you think, and it is affordable.  Alohamora Open a Book. http://alohamoraopenabook.blogspot.com/
Sixth, lay out your pictures on your paper in the layout you had initially decided upon.  We ending up moving it a bit more once it was on the paper again, but your initial layout will save you a lot of time in this step.

Seventh, using a ruler and level make sure the pictures are straight and even.  We opted to have the majority of the top of the gallery wall to be level on one line, but the bottom isn't.  We also wanted the sides on one line as well.  My husband is an engineer; he gets more exact and excited about the numbers of centering on paper etc.  I personally just went with the visual of how it looked, but then used the ruler and level to make sure it was straight.  

Eighth, after your pictures are straight use a pencil and trace around the top and half way down the sides of each picture.  You'll want to be precise here b/c this will give you an exact location of where to put your nails.  This is why the previous step is so important, and it will save you a lot of hassle in the next few steps.   

DIY Gallery Wall, a simplified how to tutorial.  It's a lot easier than you think, and it is affordable.  Alohamora Open a Book. http://alohamoraopenabook.blogspot.com/
Ninth, remove your pictures from the paper.  You should see your pencil markings underneath.  

Tenth, tape your paper onto the wall you are hanging your gallery.  Again, you will want to make sure you paper, or at least the line that the top of your gallery wall is lined up on, is straight and level.  
Eleventh, use a hammer and nails and hang up all of your pictures.  We ended up doing two nails for each canvas to give us a steady and secure location for the pictures to hang.  We used the pencil outlines to know exactly where to hang.  While hanging the pictures we would measure the back of the canvas where the nail would hang (under the wood frame), and then measure down that same distance on the pencil markings on the paper.  

Hanging the pictures was actually incredibly quick b/c all of the precise work was done before.  

DIY Gallery Wall, a simplified how to tutorial.  It's a lot easier than you think, and it is affordable.  Alohamora Open a Book. http://alohamoraopenabook.blogspot.com/

Finally, remove the pictures from the wall, but leave the nails in.  Then remove the paper by lifting the paper up over the nails.  All of the nails will still be in place, and you can easily put the pictures back up on the wall.  We didn't even need to double check it after putting the pictures up again; it was all level and looking good.

DIY Gallery Wall, a simplified how to tutorial.  It's a lot easier than you think, and it is affordable.  Alohamora Open a Book. http://alohamoraopenabook.blogspot.com/


Gallery walls seem scary; they did for my husband at least.  I had actually completed all of the pictures over a month ago, but my husband was not excited and downright nervous to hang them all.  He figured it was going to be challenging, frustrating and all around beastly.  Therefore he procrastinated until I said we were doing it.  

Using the paper as a layout and measuring everything before outlining the pictures made all the difference.  My husband even commented after that "it was a lot easier than he thought it would be." 

 Sure you may think a gallery wall looks really neat, but actually getting it all planned out and on the wall is much too difficult and time consuming.  However, it really isn't difficult or time consuming.  We completed the hanging of the gallery wall during nap time.

A gallery wall takes some planning, but it doesn't take nearly as much time as you would think.

Plus, it really is worth it.  My kids love pointing to their pictures on the wall, and all of our guests have commented on how fabulous the gallery wall looks.  

Now, I am excited to switch out canvases over time so that our gallery wall looks like a true gallery built over years and years.  

On a  completely different note, I participated in my first Link Up party over at Living Well Spending Less, and I even had someone find my blog and get some book ideas from that Link Up party.  Exciting stuff! Just had to share my excitement with yall!

Happy DIYing!  As always, holler if you have any questions or need any clarifications.  

Saturday, February 1, 2014

DIY Striped Picture Frame

Easy DIY Striped Picture Frame. Cheap and affordable.  Anyone can do it. Alohamora: Open a Book http://alohamoraopenabook.blogspot.com/

I have had the thought and idea of a gallery wall for awhile.  Once I had the idea in my head I started to look for picture frames that I thought would work in that space, with the style and colors I wanted.

I never found the perfect frames.

Then I saw plain wood frames ready to be painted or stained or whatever one desires at JoAnns.  Using a 40% off coupon on my phone from Hobby Lobby (b/c they take competitors) and a 50% off JoAnns coupon I was able to get 2 thick simple and contemporary looking frames for a 5x7 picture for less than $10 all together including tax.  Awesome!  I love cheap affordable!

My gallery wall is going to be a mix of framed and canvas pictures.  Yet again, b/c I have to live within a budget I had to do the canvas pictures myself.  When I was painting the edges of my canvas is when I painted the picture frames a base color white.  Here's the link for the canvas picture DIY and the pictures for painting the frames.

For the purpose of my pictures and the location on the gallery wall I wanted one frame to be a simple solid white and the other striped to add a little fun and pizzazz.
Easy DIY Striped Picture Frame. Cheap and affordable.  Anyone can do it. Alohamora: Open a Book http://alohamoraopenabook.blogspot.com/

Completing a striped picture frame was easier than I thought, and I love the impact it has on the wall.

As with every DIY I did learn a few things along the way; I might as well share them with you so you can do it yourself a little easier and with fewer mistakes.  

What You Will Need
  • Wood picture frame you can paint
  • 2 colors of paint (I went with spray paint with primer already included)
  • Painters or Frog tape of various widths
  • Ruler
  • Scissors

As discussed above.  You first must paint your base color.  I went with white.  I used spray paints which allowed for fast easy coverage, but it does limit you a bit.  I did end up having to paint two coats on the frames, but that is b/c I like to be thorough.  

After the base color has dried completely you can tape your lines down.  
Easy DIY Striped Picture Frame. Cheap and affordable.  Anyone can do it. Alohamora: Open a Book http://alohamoraopenabook.blogspot.com/

I had to use painter's tape and then masking tape b/c those were the widths I had.  If I were to do this again, and for you I would buy frog tape (the seal on the tape is a bit better) of 2 different widths, or at least one painter's tape and one frog tape.  Masking tape should be your last resort.  

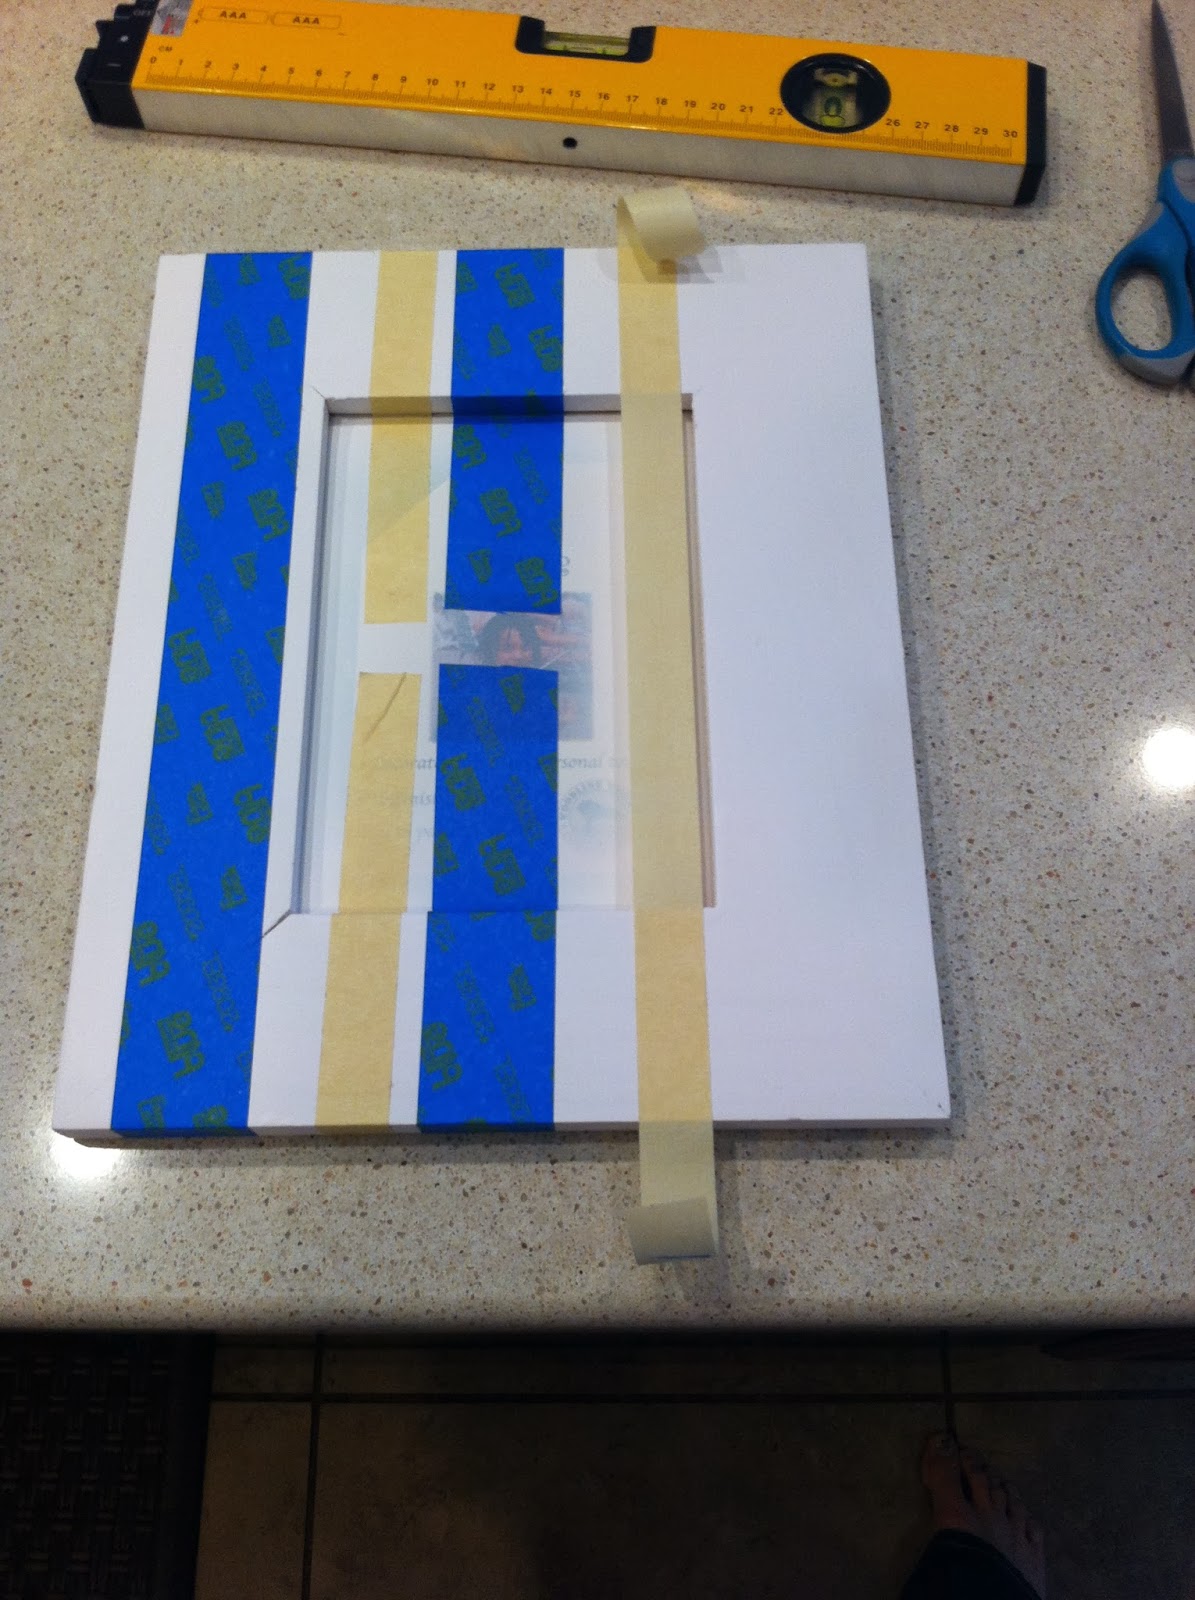
I purposely made the distance between tape vary in size.  I found it critical to use the ruler to make sure your lines are straight all the way up and down and that the distance between the edge of frame and edge of the tape was the same at the top and bottom.  Now, I'm a bit OCD (that's the librarian in me coming out) so I was double and triple checking everything.  

I did find it a bit tricky to make sure the lines go down to the picture and continue straight on the other side.  Therefore, as shown in the picture above  I would pull a piece of tape completely across the picture area.  

After measuring and making sure the tape was even and straight I would then use scissors and cut the tape in a spot over the picture section.

After cutting you'll end up with two pieces of tape, but the critical areas (the top and bottom of the picture area) is already secured and lined up.  So easy.  

Carefully, tape the inside part of the frame and just eye it to make sure it looks straight.  Use the edge of the ruler or your nails to secure the tape down in the corner so paint doesn't slip through.
Easy DIY Striped Picture Frame. Cheap and affordable.  Anyone can do it. Alohamora: Open a Book http://alohamoraopenabook.blogspot.com/

I believe taping is always the most difficult part of the process, but if you do a good job then the rest of the process is a piece of cake.  
Easy DIY Striped Picture Frame. Cheap and affordable.  Anyone can do it. Alohamora: Open a Book http://alohamoraopenabook.blogspot.com/

Painting took all of 5 minutes, but I did end up doing two coats just to be sure.  A couple hours of dry time in between the coats was enough. 

When I painted stripes in my kids bathroom I learned that you should take the tape off sooner rather than later.  If you wait too long then the paint seems to seep.   Therefore, take your tape off when your paint is partly dry.  

Somehow I forgot that rule.  I think my kiddos waking from their naps was probably the reason why I just picked up the frames and stuck them on saw horses in the garage to dry.  The then forgot about the frames for a couple of days while they dried.  Whooops. 

Easy DIY Striped Picture Frame. Cheap and affordable.  Anyone can do it. Alohamora: Open a Book http://alohamoraopenabook.blogspot.com/

At this point if you used painters tape or Frog tape and you took the tape off after it was partly dry you would be good to go.  Just let it dry completely, put your picture in, and hang it up.  

However, as you can see from the picture above I had paint seep. Darn cheap tape and leaving the tape on for far too long.  

However, after doing the DIY Growth Chart Ruler  I had learned about the flexibility paint pens have.
Easy DIY Striped Picture Frame. Cheap and affordable.  Anyone can do it. Alohamora: Open a Book http://alohamoraopenabook.blogspot.com/

I went to Hobby Lobby, used a coupon making it $2 or less, and carefully corrected all of my seeping issues as a result of cheap tape and not taking the tape off at the right time.  

The paint pen worked fabulously, and you can't even tell there were issues to correct.  
Easy DIY Striped Picture Frame. Cheap and affordable.  Anyone can do it. Alohamora: Open a Book http://alohamoraopenabook.blogspot.com/

So, lesson learned from my DIY Striped Picture Frame: Use good quality tape, remove the tape when partly dry, and if you make mistakes paint pens are awesome.  

PS- I know the color of the frame in the completed pictures looks different than the ones I worked on.  However, I took the pictures in different areas (front room with good lighting vs. the table where I was working) and I only take pictures with my oh so fancy and high quality iPhone.  Forgive me please... I'm not trying to trick you.  They are all the same frames.  

Happy DIYing!  

Try this striped picture frame.  It's a nice change/look, fun to do, cheap and affordable, and easy.  If I can do it, you most definitely can do it.  Plus, you'll have fewer mistakes b/c you'll have learned from mine.  Score!  
  
Next up... I'll reveal the completed gallery wall and how to plan the layout.   

Sunday, January 12, 2014

DIY Canvas Photo


DIY Canvas Photos. Transfer photo to canvas using Mod Podge- Alohamora http://alohamoraopenabook.blogspot.com/

I have always thought pictures on canvas looked so relaxed but classy at the same time.  For awhile I have wanted to do a gallery wall.  So, I finally decided I would do a gallery wall with a mix of frame and canvas prints.

After we finally got family pictures taken I figured the wall gallery lay out a bit and realized there was no way we would ever be able to afford the number of canvas pictures I wanted to do.

I had a friend that put pictures on canvas, and I figured I'd do the same.  I mean, you can get canvas pictures at a craft store for around $5.  Five dollars plus printing out the pictures plus Mod Podge seemed MUCH more affordable.  If you want to put pictures on canvas then this is your affordable option.

However, I'm all about being real here (I mean I don't Photoshop my fancy iPhone pictures... I'm all about real).  These pictures look really good,... BUT if you are thinking that it is going to look like those fancy canvas pictures that cost at least $50 they don't.  Honestly, they look like pictures with a different kind of frame.  They look different, but they still look really good and I'm happy with them.  I just want to be honest with you since I learned a few things along the way.


DIY Canvas Photos. Transfer photo to canvas using Mod Podge- Alohamora http://alohamoraopenabook.blogspot.com/
Speaking of being honest, let me just say that so, so , so many other blogs/craft websites LIE.  Seriously, I'm a librarian.  I do research before a project.  I do A LOT of research b/c yet again I'm a librarian that likes to be thorough.

Everything I read talked about the project taking 5 to 10 minutes.  So, I got everything ready and when the kiddos went down for their naps I was ready to complete the projects as well as fold clothes, write blog posts, and get dinner ready.  I had big plans for nap time, but I was deceived on this project.  Sure, the "active time" of actually working on the project was only 5 to 10 minutes, but there was the dry time of painting the edges that I did not take into consideration.  Therefore, I'm going to be real with you... either break this project into two days or plan on it taking approximately an hour to complete.
DIY Canvas Photos. Transfer photo to canvas using Mod Podge- Alohamora http://alohamoraopenabook.blogspot.com/

Though, I'll give you all the info on how to make a quick (if you don't include dry time) cheap and inexpensive canvas photo.

What You Need:


  • Picture Printed on regular photo paper (You want a high quality print out, but you can do thin photo paper if you can print it out well)
  • Canvas the same size as the picture you have printed
  • Paint for the edge of the picture.  I did white and yellow, but I think the white doesn't look as "complete" or good as the yellow.  Therefore, I would do a different color than white.  
  • Paintbrush for painting the edge of the canvas
  • Mod Podge I had glossy Mod Podge, but it doesn't really matter what kind you have it just depends on the look you are going for.   
  • Foam Brush- get a small one (about $0.25) at Walmart. 
  • Drop Cloth or paper bags to work on (paper towels do not work well, I have paper towel stuck to my Tablecloth b/c I brilliantly attempted to use paper towels as a work space protection). 


DIY Canvas Photos. Transfer photo to canvas using Mod Podge- Alohamora http://alohamoraopenabook.blogspot.com/

1. Paint just the edges and an inch or so on the top of the canvas you will be using in your pic.  When your paint is dry you can move on to the next stage.   I do recommend painting the edge; it looks a lot more  complete.   


DIY Canvas Photos. Transfer photo to canvas using Mod Podge- Alohamora http://alohamoraopenabook.blogspot.com/

2. Use Mod Podge and a foam brush to evenly coat the sides of the canvas.  This is just to give your canvas a more normal look.  

3. Use Mod Podge and foam brush to coat the top of the canvas and the backside of the picture you are going to attach to the canvas.  

4. Press picture to canvas. Rub out any bubble areas and make sure you picture is lined up evenly on the canvas.
DIY Canvas Photos. Transfer photo to canvas using Mod Podge- Alohamora http://alohamoraopenabook.blogspot.com/
 5. Mod Podge on top of the picture with an even coat making strokes in one direction.  I had read to use a cheap roller, but I would advice against that.  I found it easier and better for making consistent even strokes to use the foam brush.  If you were doing this same idea to wood instead of canvas a roller would be great b/c it is an even hard surface (ideal for rollers).  No matter how you do it just make sure not to leave any big smears on any faces.

Being a Mod Podge virgin (crazy huh?) I was a bit concerned seeing my beautiful picture all cloudy and white.  However, it'll dry clear.  Have no fear.  Though, do make sure you don't move your picture around.  At one point when trying to coat the top I slightly moved the picture and had to then get it back into place.  Not ideal.
DIY Canvas Photos. Transfer photo to canvas using Mod Podge- Alohamora http://alohamoraopenabook.blogspot.com/

6. Let your canvas picture dry. Then hang your beauty on your gallery wall (you'll see mine to come soon) or where ever your heart desires.  

As always... did you try it?  How'd it go?  Any questions?  I'm all about being honest.  No need for Pinterest Failures here.