It's the beginning of the new year. We, and your kids, are all going to grow and learn and change this year. With all that learning and growing I want to have a memory/record of where my kids were at in 2014.
I know a lot of people mark the kids growth on the wall. However, I'm pretty sure we aren't in our forever home, and I want to be able to keep these records of growth even when we move or decide to paint the kitchen yet another time.
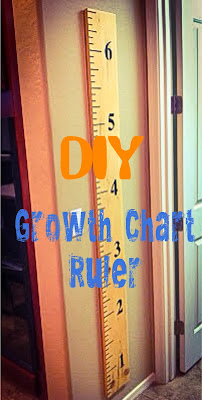
Therefore, a Growth Chart Ruler, basically a piece of wood that looks like a big ruler, we can record our kids heights on was the perfect solution.
I did a little research and found out these Growth Chart rulers are ridiculously expensive ($40 for cheap crappy looking ones and up to $80 for decent ones). I decided I could make one, and I was pretty sure with a little effort on my part I would save big in the wallet.
Since I learned a few things along the way of my making of an affordable and personalized Growth Chart Ruler I'll share what I learned and save you some time if you are wanting to do something similar.
First off, this project is cheap. All in all I didn't have any of the supplies, but it still cost me less than $15 total and it didn't take a lot of active time. I feel good about $15 for this project since they are ubber expensive online.
What You Need:
- wood, I went with a piece of cheap pine for $6 that was 6 ft. tall x 8 inches wide x 3/4 inches deep.
- small can of stain and sealer in one, I chose a clear stain b/c I wanted to keep the light natural wood color for the ruler look.
- small 1 inch paint brush. You can get these for $1 at Walmart.
- black paint pen, I found this at Hobby Lobby in the acrylic section for $3 plus they have 40% off coupons. I preferred using a small thin paint pen, but a thicker one would come in handy for the numbers if you feel so inclined.
- pencil
- measuring tape
- masking tape
- hand sander and fine sandpaper
- 3 inch stencils found at Hobby Lobby
- Picture hanging Command Strips that hold up to 16 lbs.
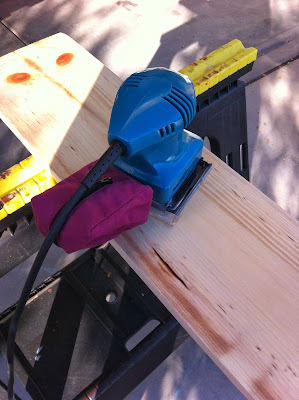
The first step is to sand your board and make it silky smooth. I decided to try something new and go with the hand sander.
Seriously, how have I been missing out on the awesomeness of a hand sander for all of these years. For way too long I have.sanded with a block of wood and a piece of sand paper wrapped around it. Ghetto I know, but that's how I learned to sand in the hood of Colorado Springs. However, this bad boy was quick, made the board super smooth, and I got a vibrating hand massage for 15 minutes as I sanded away.
Next step, pull out your measuring tape and tape it down. I started at 6 inches so that no matter the baseboard I would always be okay. Plus, with a tall husband a growth ruler going up to 6'6 was probably necessary.
So, I pulled out the masking tape and taped down the measuring tape at 6 inches, and then again way down at a 6'6. Obviously, you can start at whatever height you desire.
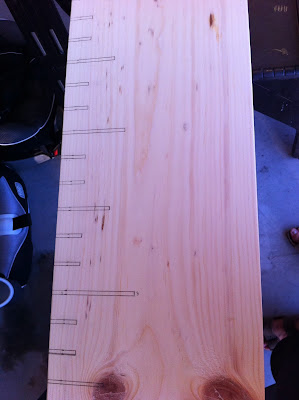
Third, go along and make pencil marks on the edge of the board for every inch. Then, I pulled out a ruler and made my marks 2/8 of an inch thick (1/8 or 1 little dash on your ruler on each side of your initial inch mark) so they would look good with paint.
Since I wanted the growth ruler to look like a ruler I decided to make the inch mark, 3 inch, 6 inch, 9 inch, and then foot marks different lengths. I found this made my ruler look great, but if this sounds funny/confusing check out a ruler and you'll understand what I mean with varying length marks.
I ended up going with the following measurements:
- inch marks 1 inch long
- 3 inch and 9 inch marks were 2 inches long
- 6 inch mark is 2.5 inches long
- foot marks are 3 inches long
Now, that you have everything in pencil, erase any marks that you won't be covering up with paint.
However, before you paint you need to use your stain/sealer to do a prior coat. This will prevent the paint from bleeding. Stain your wood, and wait at least a couple hours or 24 hours if you can to let the stain dry thoroughly.
Once the stain is completely dry pull out your paint pen. Go through and paint all of the dashes as well as numbers. This actually didn't take as long as I initially thought; it took maybe 20 minutes.
I bought a fine paint pen and that worked great for the dashes and getting into all of the little crevices along the numbers. I also bought a wide paint pen that somewhat worked on the numbers. It made the number painting a little faster, but I'm not sure it was worth the few bucks for the little painting I did with it.
After I was completely satisfied the paint job, I let the board dry. Again, I think you could wait 24-48 hours and be good. I actually didn't get to it until a week later b/c there were too many things going on.
 The next to final step is to seal the board again. Since my stain and sealer were together as a combo I pulled out my little can and sealed away. This step took me less than 5 minutes to seal. Now, if you would like a shiny growth chart ruler go with a second coat of stain/seal after the initial top coat has dried for a couple of hours. However, I was going for a more natural look (hence the clear stain) so I stopped at one top coat.
 With the stain/seal dry I was ready for the final step of hanging the board. I opted for the quick and damage free walls route. I had bought some Command Strips that were for hanging pictures up to 16 lbs. You use 4 strips on the board and 4 four strips on the wall. We attached the strips to the board, measured and leveled where we wanted to hang it. Measured and leveled again b/c we didn't want to make a mistake. We then removed the strips' backing that attaches to the the wall and pressed it against the wall. As my husband lined up the bottom, I used a level held against the edge of the board to be sure we were really putting it up straight. We both held and pressed the board into place for about a minute and then we were done.
It was quick and easy and awesome looking! Plus it cost about $15 with no more than 2 hours of active time. Not bad for a DIY activity.
Making a growth chart ruler was super easy and super fast. The part that took the longest was letting everything dry in each of the steps. Often times I just wanted to move to the next step b/c I was so excited with how it was looking, but instead I had to be patient Darn that dry time!.
Just remember, Everyone Grows... Why Not Record the Growth?
The first mark of the new year on our growth chart ruler is for a 3 foot tall Olivia, and a 2 feet 8 inches tall Lucas. My kids LOVE standing in front of the ruler and getting measured.
It's cute to seem them excited, and I'm so very excited to have a fixture that we can move with us but yet it still keeps track of our kids height. It's a win-win for everyone.
Yay for cute completed projects. Now, onto my next one or two projects; a canvas picture gallery wall and a magnetic paint wall are currently in the works/research phases. However, I do have a couple t-shirt quilts I want to do to. Ahhh... too many ideas!


No comments:
Post a Comment